A MacBook crash, an accidental delete, or a sync gone wrong, and suddenly years of saved articles, annotated PDFs, and e-books simply no longer exist. It happens more than people admit, and the recovery options are rarely as simple as hoped.
Digital reading files (like ePubs and PDFs) take time to build and are far harder to reconstruct than most other file types. This is because so much of their value sits in the highlights, annotations, and notes added along the way.
Luckily for Mac users, there are many cool features specific to the operating system. One such feature is the ability to back up data and keep those files protected without disrupting normal workflows. Here are five ways to back up your digital reading files on Mac.
1. Use Time Machine for automatic local backups
Time Machine remains one of the most underused tools on macOS, which is surprising given how quietly effective it is. Once connected to an external drive and switched on, Time Machine quietly runs in the background, taking hourly snapshots of everything on the Mac, including your digital reading folders, PDF libraries, and e-book collections.
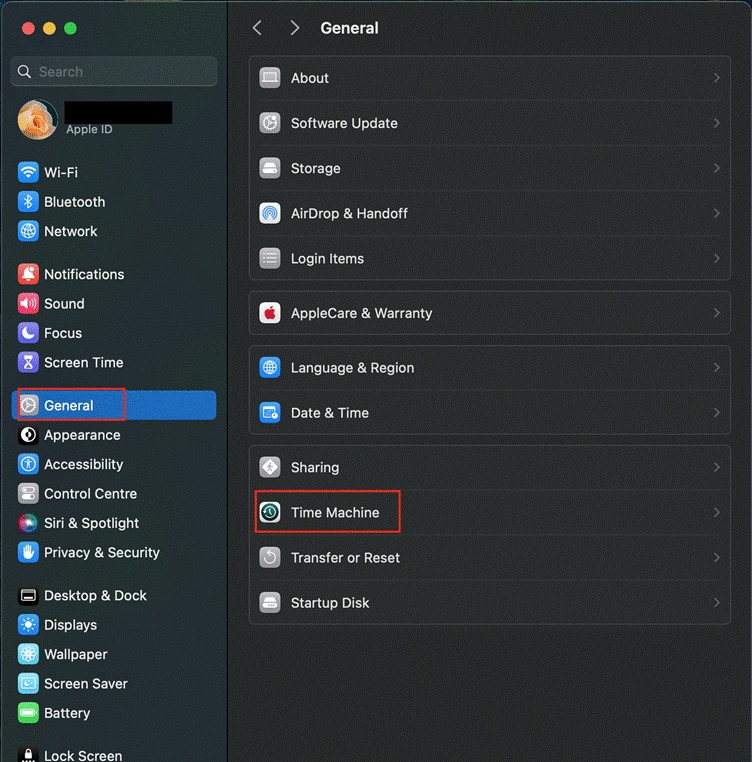
Setting up Time Machine on Mac takes less than five minutes, and here’s how:
- Connect the hard drive to your Mac via USB or Thunderbolt.
- Open Apple Menu > System Settings > General.
- Navigate to Time Machine, then select the drive as the backup destination.
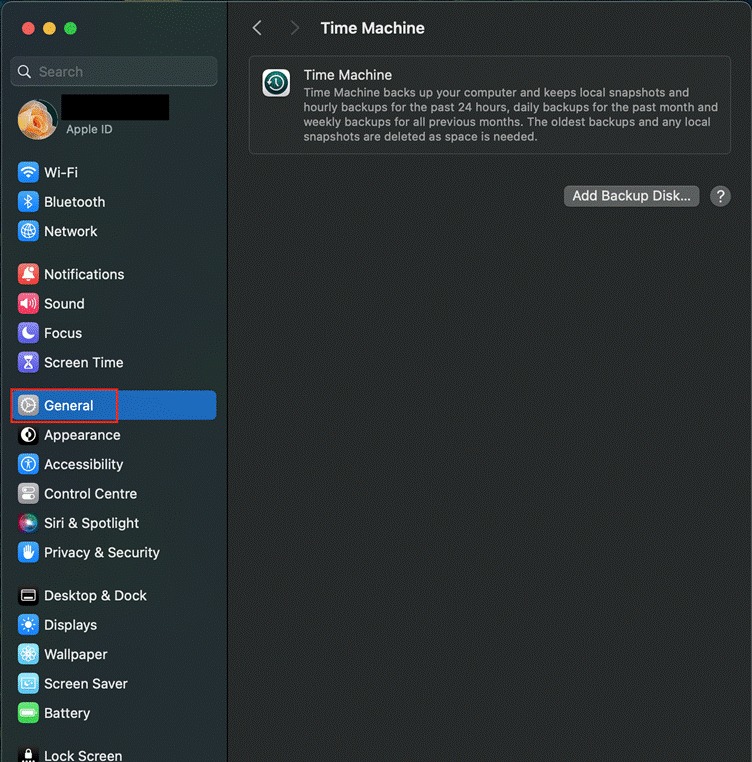
From that point on, macOS takes care of everything, automatically creating hourly, daily, and weekly snapshots.
I’ve used Time Machine for years, and what stood out most was the first time I actually needed it. A folder of annotated academic PDFs disappeared after a failed macOS update, and Time Machine restored every single file, complete with all annotations, in under three minutes.
The good news is that there’s no subscription required to use Time Machine on your Mac, nor do you need a third-party app; just a backup that’s been running quietly in the background. For anyone building a serious reading archive on a Mac, this is the foundation for everything else.
2. Sync to iCloud
iCloud Drive is an obvious first choice for Mac users, and with good reason: it’s baked right into the Finder, and works effortlessly between Apple devices.
Enabling the Desktop and Documents Folders option in iCloud settings means that files saved there are automatically uploaded to iCloud and are accessible from any iPhone or other Mac signed in with the same Apple ID.
However, you still need to maintain your local storage. A common issue that catches Mac users off guard is iCloud taking space on the local drive even after files have been synced online.
This happens because iCloud keeps local copies of recently accessed files until macOS decides to offload them, meaning the Mac’s internal storage can still fill up even when the cloud is doing its job. Before long, if it’s not maintained, your 256GB or 512GB MacBook will fill up fast.
To get the best out of iCloud for reading backups, I suggest you organize files into folders within the documents directory and optimize storage in iCloud settings so older files aren’t stored locally.
3. Back up to an external hard drive manually
Manual backups to an external hard drive might sound old-fashioned, but for large reading libraries, they’re a cost-effective and reliable approach. A 2TB portable SSD can hold an enormous reading archive and costs far less per gigabyte than cloud storage subscriptions.
The process is simple: plug in the external drive, open Finder, and drag the reading library folder directly to the drive. If you want a more automated approach, macOS’s built-in Automator app can create a workflow that copies a specified folder whenever the drive is plugged in.
One thing I always do with my Mac backup for digital reading files is use a naming scheme for the backup directories. For instance, my recent backup directory is called “Reading Backup 2026-05” — so I know which one was backed up most recently.
For researchers and students who work with annotated PDFs and reference documents, this physical backup strategy for your digital reading files pairs especially well with a cloud option. The external drive is the main safety net; the cloud provides accessibility across devices.
4. Add a third-party cloud service for off-site coverage
Relying on a single backup location, whether local or cloud, leaves a gap. Off-site redundancy means that even if both the Mac and the external drive are lost in the same incident (a fire or theft), the reading library still exists elsewhere.
Third-party cloud services ensure just that. Backblaze is worth a close look for Mac users with large reading libraries. Its desktop app runs in the background and continuously backs up the entire drive to secure cloud storage for a flat monthly fee, with no storage cap.
Dropbox and Google Drive are perfect if you prefer folder-level syncing, and both let you recover older versions of annotated documents. Pairing any of these with iCloud or Time Machine creates the kind of layered protection that data recovery professionals recommend: at least three copies, on at least two types of storage, with one stored off-site.
Final thoughts
None of these methods requires advanced technical knowledge, and most take less than fifteen minutes to set up. The real work is building a habit. Time Machine handles the day-to-day automatically, iCloud keeps files accessible across devices, an external drive provides large-scale physical storage, a third-party cloud service adds off-site protection, and exporting from reading apps ensures nothing stays trapped in a closed ecosystem. From my experience, using two or three of these together covers every realistic data loss scenario you can envisage as a Mac user.